Step 1: Purchase a PenguinVPN 2.0 subscription:
![]()
Open ThinkPenguin.com in a new tab.
Go to the networking and modems section:
Then click the PenguinVPN Subscription link:
Step 2: If this is your first time signing up for our PenguinVPN services select the "Please give me a new username/key for this new subscription" in the "New account or extending a VPN Subscription?:" drop down box.
Step 3: At checkout you will need to select the VPN Protocol Credentials you'd like to receive.
Select the Wireguard option.
Step 4: When making a purchase you have to decide the length of service you'd like to pay for up front. The longer the subscription the less expensive it becomes on a monthly basis. There are no refunds or cancellations, but there is also no automatic renewal here either. You can choose to get a short subscription to try it out and come back and renew the subscription manually later if you like. Just make sure to note the expiration date and order # as we do not nag you about renewing when your subscription runs out. The service will simply stop working.
Step 5: You will get an email containing your PenguinVPN 2.0 Subscription Credentials whether that is for the OpenVPN protocol or the Wireguard protocol or both, depending on what you selected. This may take some time. It's not instantaneous unfortunately. You'll need this to continue setting up the PenguinVPN 2.0 subscription.
Once it arrives save download and save the PenguinVPN.conf file to your downloads folder.
Step 6a: There is an easy way to to add a WireGuard VPN connection and a hard way.
The easy method is through the terminal surprisingly. To do that click the icon in the top left corner and search for and open the terminal app. Then copy and paste to the following line to the terminal:
nmcli connection import type wireguard file /home/$USER/Downloads/PenguinVPN.conf
After pasting hit enter. Note: You need to make sure you saved the PenguinVPN.conf file from the PenguinVPN 2.0 credentials email in your downloads folder.
Example of what will be shown after successfully setting up your PenguinVPN connection:

You can skip to step 22 since you've setup your PenguinVPN subscription on Fedora the easy way.
Step 6b: Or you can do it through the GNOME graphical interface the hard way. ie Manual entry. Once you have the credentials email go to the network / audio icons in the top right corner. Then the gear icon for settings.
Step 7: Under the network section click the + icon next to the VPN section.
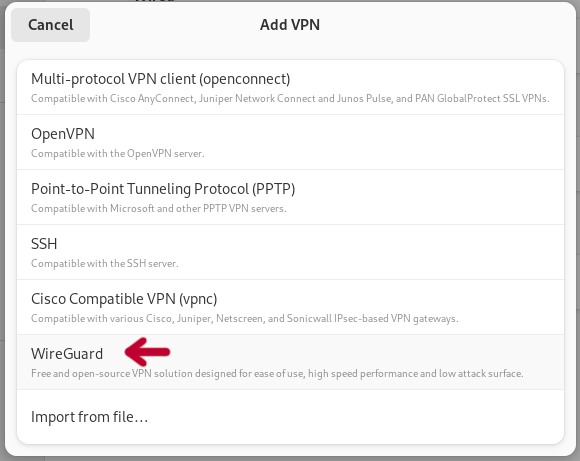
Step 8: Select WireGuard from the list of VPN options:
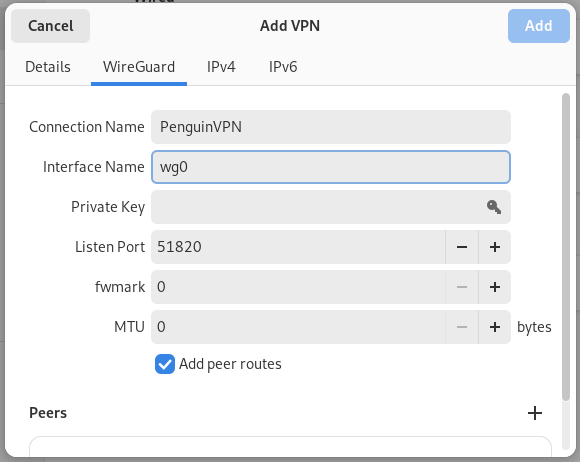
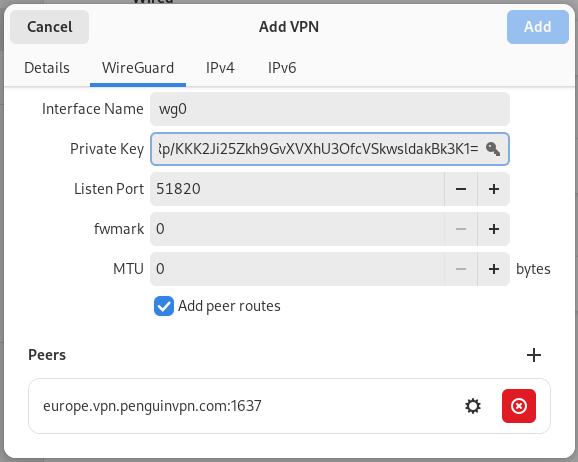
Step 9: Under the WireGuard tab enter the connection name and interface name as shown below:
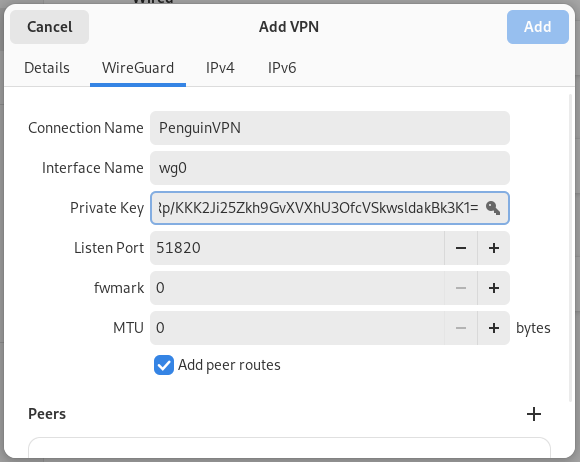
Step 10: From the PenguinVPN 2.0 Credentials email copy over the private key.
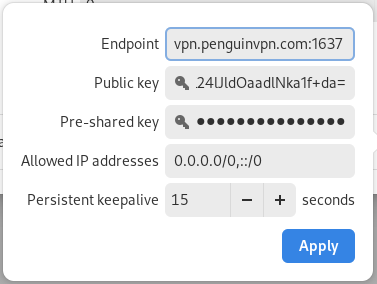
Step 11: Click the + icon and enter the peer info from your Penguin VPN 2.0 Credentials email:
Step 12: The WireGuard tab should now look something like this with a peer in the Peers section:
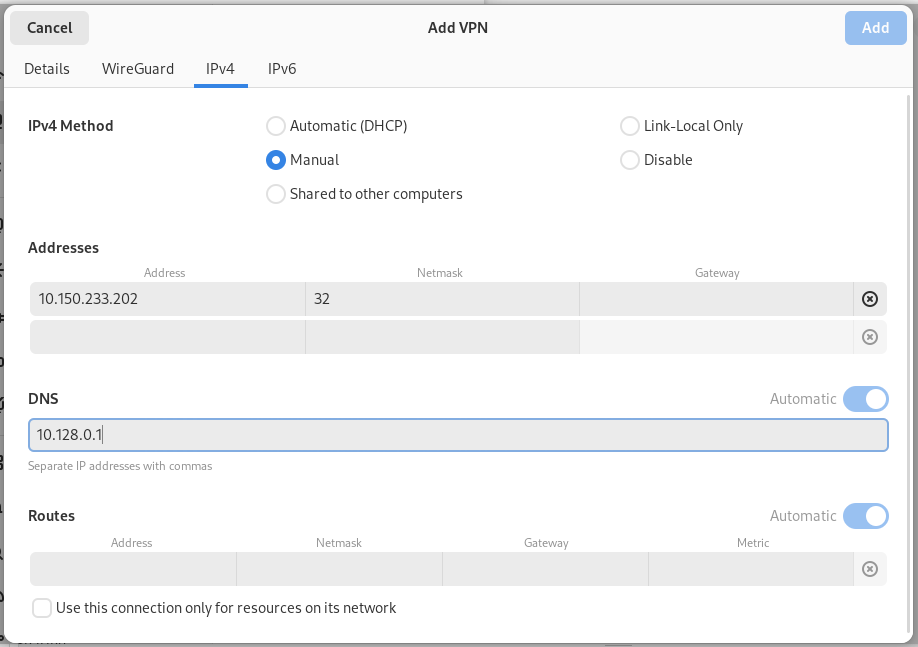
Step 13: Under the IPv4 tab select the Manual option.
Step 14: In the Address box copy over the address from your PenguinVPN 2.0 Credentials email:
This is everything up to the the first '/' from the address line (not including the quotation marks).
Example:
Address = 10.150.233.202/32,fd7d:76ee:e68f:a993:936b:f12e:f36d:61f9/128
If the above were from your PenguinVPN 2.0 credentials email you would enter 10.150.233.202 into the Address box.
Step 15: Copy over the netmask from your PenguinVPN 2.0 Credentials email:
Example:
Address = 10.150.233.202/32,fd7d:76ee:e68f:a993:936b:f12e:f36d:61f9/128
If the above were from your PenguinVPN 2.0 credentials email you would enter 32 into the Netmask box.
Step 16: Copy over the DNS from your PenguinVPN 2.0 Credentials email:
Example:
DNS = 10.128.0.1, fd7d:76ee:e68f:a993::1
If the above were from your PenguinVPN 2.0 credentials email you would enter everything between the first '=' sign and the first ',' into the DNS box like so:
10.128.0.1
You should now have the following fields propagated in the IPv4 tab:
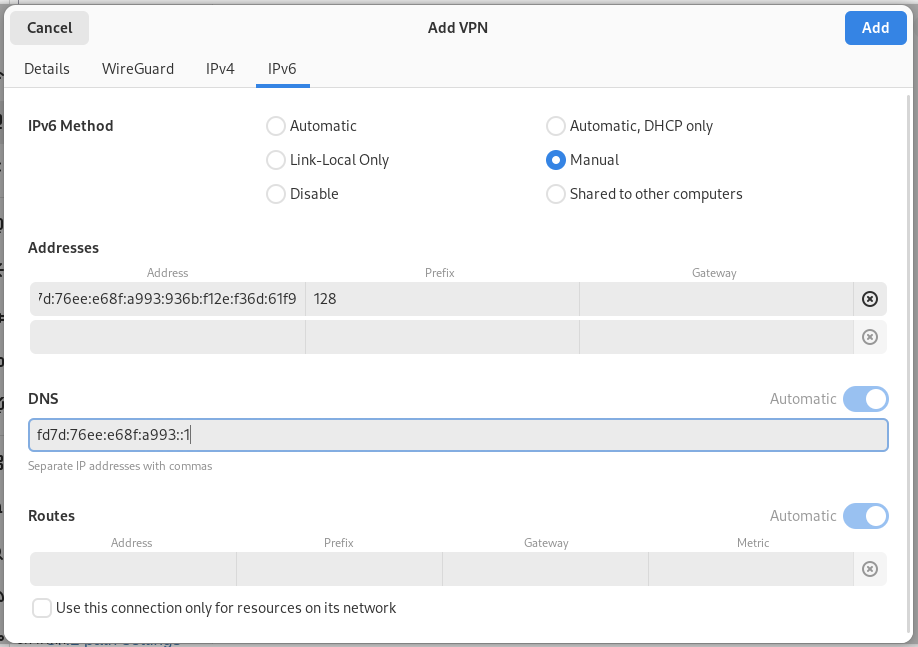
Step 17: Under the IPv6 tab select the Manual option.
Step 18: In the Address box copy over the address from your PenguinVPN 2.0 Credentials email:
This is everything between the first comma and and the 2nd '/'
Example:
Address = 10.150.233.202/32,fd7d:76ee:e68f:a993:936b:f12e:f36d:61f9/128
If the above were from your PenguinVPN 2.0 credentials email you would enter fd7d:76ee:e68f:a993:936b:f12e:f36d:61f9 into the Address box.
Step 19: Copy over the Prefix from your PenguinVPN 2.0 Credentials email:
Example:
Address = 10.150.233.202/32,fd7d:76ee:e68f:a993:936b:f12e:f36d:61f9/128
If the above were from your PenguinVPN 2.0 credentials email you would enter 128 into the Prefix box.
Step 20: Copy over the DNS from your PenguinVPN 2.0 Credentials email:
Example:
DNS = 10.128.0.1, fd7d:76ee:e68f:a993::1
If the above were from your PenguinVPN 2.0 credentials email you would copy everything after the first comma into the DNS box like so:
fd7d:76ee:e68f:a993::1
You should now have the following fields propagated in the IPv6 tab:
Step 21: Click the Add button

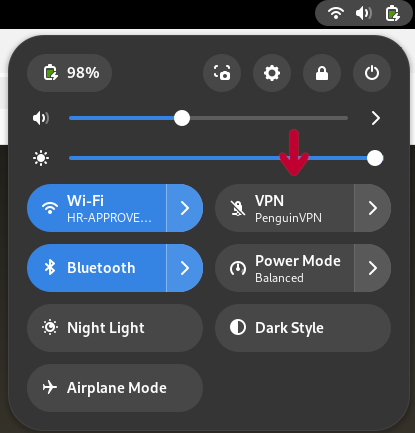
Step 22: You can now utilize the PenguinVPN button from the network/sound applet in the top right corner to connect and disconnect from the VPN:
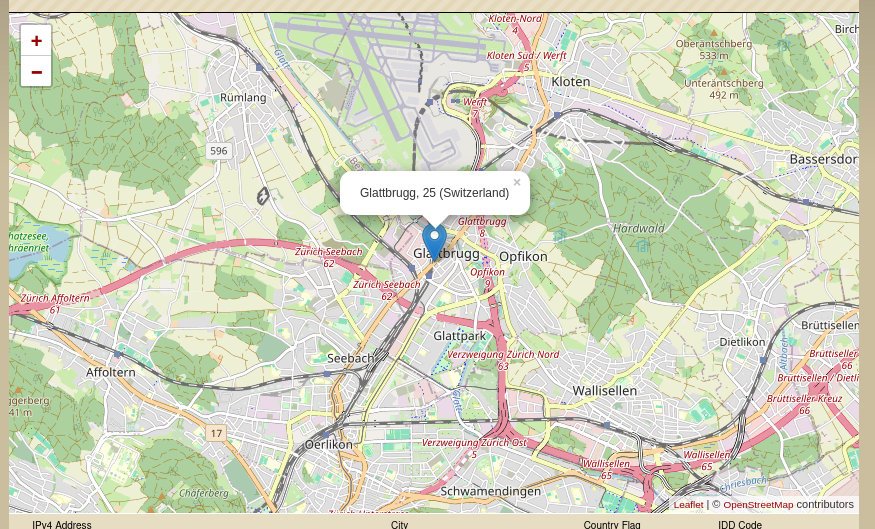
Step 23: Open a new tab and find out where the internet thinks you're from: https://www.infosniper.net
