This is an updated guide to setting up a wireless mesh network using TPE-R1300 wireless routers with OEM images of libreCMC 6.x. The directions assume you have wpad-mesh-wolfssl package installed already which ships in the OEM images (ie the mesh networking software). If there is no OEM image due to your use on a discontinued model or non-ThinkPenguin model you will need to install it.
We also have a simpler guide than described below for those who don't care to understand the details of how the mesh is configured manually: simpler guide.
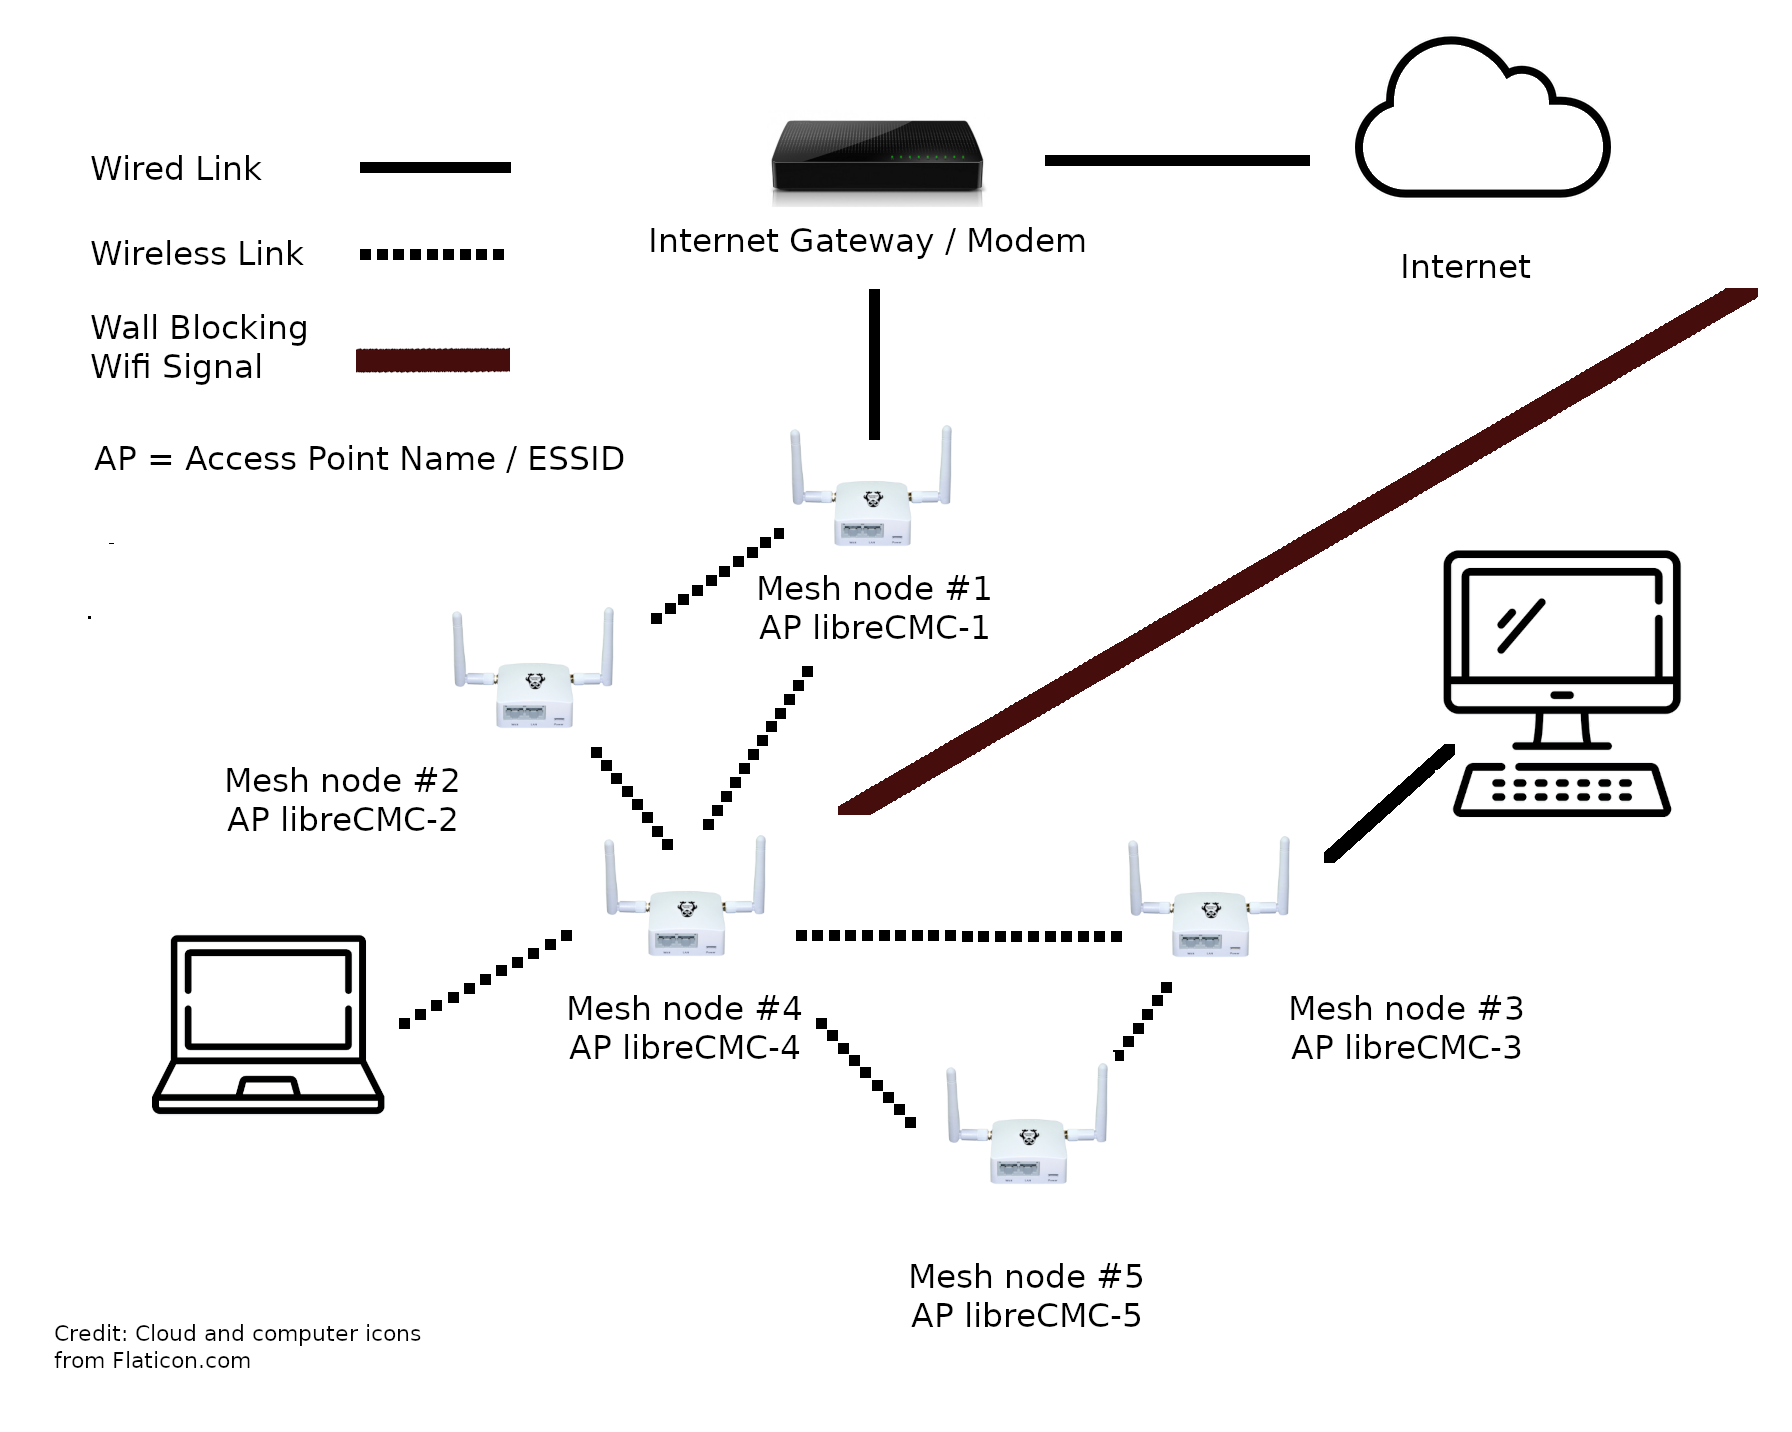
Mesh node #1
This acts as gateway for the mesh, connects mesh to internet via WAN port.
Connect power, antennas, and an ethernet cable from the LAN port to your computer, connect dynamically to the wired connection, and disable wireless.
Open a web browser and enter https://192.168.10.1/ into the address bar, hit enter.
You will get a security warning... this is normal. If using Firefox based browser click the Advanced... button and then the Accept the Risk and Continue button.
There is no password set by default. Just click the Log in button.
Click the Go to password configuration ... button and set a log in password for the router. Click the Save button.
Click the SSH Access tab. In the Interface drop down box select the LAN interface. Click the Save & Apply.
Go to Network > Wireless and click the Add button.
Select 802.11s from the Mode drop down box.
Enter mesh-backend in the Mesh Id box.
In the Network drop down box select LAN.
Click the Wireless Security tab and select WPA3-SAE from the Encryption drop down.
Enter a password in the Key box, example librecmc. Note: A stronger password is recommended.
Click the Save button.
Click the Save & Apply button.
Go to Network > Interfaces and click the Edit button for the LAN interface.
In the IPv4 address box change the IP to 192.168.9.1. Click the Save button.
Click the Save & Apply button. Click the Apply and keep settings for the Connectivity change message.
When Device unreachable! message appears go to your computers network applet and disconnect from the wired network. Then reconnect. The router will issue you a new IP.
Back in the web browser change the address in the address bar to the routers new IP: ie https://192.168.9.1, hit enter, and log back in.
You will get a security warning... this is normal. If using Firefox based browser click the Advanced... button and then the Accept the Risk and Continue button.
You can connect an ethernet cable from the WAN port on the router to a modem or other routing device with internet connectivity.
You should now be able to access the internet.
Go to Network > Wireless.
Click the Edit button for the libreCMC SSID.
In the ESSID box change the ESSID to libreCMC-1.
Click the Wireless Security tab.
In the Encryption drop down box select WPA2-PSK (strong security).
Enter a password in the Key box. For example librecmc. Note: A stronger password is recommended.
Click the Save button.
Click the Save & Apply button.
You can now disconnect from the wired network and test access to the mesh by selecting the libreCMC-1 access point from your computers network applet.
If you setup a VPN you'll want to stop tunnelvission attacks by an ISP or an upstream routing device. To do that do the following:
ssh root@192.168.9.1
uci set network.wan.classlessroute=0
uci commit
service network reload
Mesh node #2
Connect power, antennas, and an ethernet cable from the LAN port to your computer, connect dynamically to the wired connection, and disable wireless.
Open a web browser and enter https://192.168.10.1/ into the address bar, hit enter.
You will get a security warning... this is normal. If using Firefox based browser click the Advanced... button and then the Accept the Risk and Continue button.
There is no password set by default. Just click the Log in button.
Click the Go to password configuration ... button and set a log in password for the router. Click the Save button.
Click the SSH Access tab. In the Interface drop down box select the LAN interface. Click the Save & Apply.
Go to Network > Interfaces and click the Edit button for the LAN interface.
In the IPv4 address box change the IP to 192.168.9.2.
In the IPv4 gateway box enter the IP of the first mesh node: 192.168.9.1
Click the Save button.
Click the Save & Apply button. Click the Apply and keep settings for the Connectivity change message.
When Device unreachable! message appears go to your computers network applet and disconnect from the wired network. Then reconnect. The router will issue you a new IP.
Back in the web browser change the address in the address bar to the routers new IP: ie https://192.168.9.2, hit enter, and log back in.
You will get a security warning... this is normal. If using Firefox based browser click the Advanced... button and then the Accept the Risk and Continue button.
Go to Network > Interfaces and delete all the WAN interfaces.
Click the Save & Apply button.
Click the Devices tab.
Click the Configure... button for the br-lan device.
Under the Bridge ports drop down select eth0 and eth1.
Click the Save button.
Click the Save & Apply button.
Go to Network > Firewall and delete all zones.
Go to System > Startup.
Click on the Enabled buttons for dnsmasq.
Click on the Enabled buttons for firewall.
Click on the Enabled buttons for odhcpd.
Go to Network > Interfaces and click the Save & Apply button.
Click the Edit button for the LAN interface.
Click the DHCP Server tab and check the box that says Ignore interface.
Click the Advanced Settings tab and uncheck the box that says Dynamic DHCP to disable DHCP for this interface.
Note: The WAN port will now act as a LAN port.
Click the Save button.
Click the Save & Apply button.
Go to Network > Wireless and click the Add button.
Select 802.11s from the Mode drop down box.
Enter mesh-backend in the Mesh Id box.
In the Network drop down box select LAN.
Click the Wireless Security tab and select WPA3-SAE from the Encryption drop down.
Enter a password in the Key box, example librecmc. Note: A stronger password is recommended.
Click the Save button.
Click the Save & Apply button.
Go to System > Reboot and click the Perform reboot button.
On your computer go to the network applet and disconnect from the wired network, then reconnect.
You should now have internet connectivity.
Go to Network > Wireless.
Click the Edit button for the libreCMC SSID.
In the ESSID box change the ESSID to libreCMC-2.
Click the Wireless Security tab.
In the Encryption drop down box select WPA2-PSK (strong security).
Enter a password in the Key box. For example librecmc. Note: A stronger password is recommended.
Click the Save button.
Click the Save & Apply button.
You can now disconnect from the wired network and test access to the mesh by selecting the libreCMC-2 access point from your computers network applet.
To setup node #3 repeat the steps for node #2, but replace libreCMC-2 with libreCMC-3 and IP 192.168.9.2 with 192.168.9.3, repeat with the number 4, 5, 6, etc for each new node you want to add to the mesh network.