![]()
Step 1:
Download and install WireGuard from F-droid or the Play Store
Step 2:
Open WireGuard and click the + icon
Step 3:
Select CREATE FROM SCRATCH option
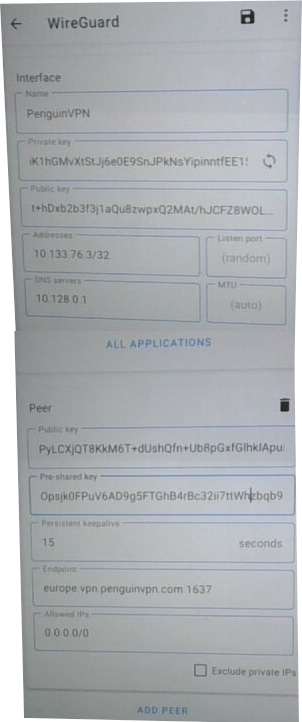
Step 4: In the name field enter PenguinVPN
Step 5: In the Private key field enter the PrivateKey which is everything after the "PrivateKey = " in the [Interface] section, example of what to copy over below:
AAccgBA/IJmUNsWfWq9hcu5wjyYOwepSVvFb1k12k3f=
Step 6: In the Addresses field enter the IPv4 Address from the Address line in the [Interface] section, example of what to copy over below:
11.271.46.3/32
Step 7: In the DNS servers field copy over the IPv4 Address from the DNS line in the [Interface] section, example of what to copy over below:
10.128.0.1
Step 8: Click the ADD PEER button
Step 9: Copy the PublicKey into the Public key field from the [Peer] section, example below:
FylCxAqT9kKM3T+DusoQfN+ub4fGxfGlxKIBeufg+f3=
Step 10: Copy the PresharedKey into the Pre-shared key field that says (optional) from the [Peer] section, example below:
OMojb1DOKv1Ad0k1fTKIb2Rbc39Ii2TTW9cbQb9H3q4=
Step 11: In the Persistent keepalive field enter 15 (yes, where it says optional, not recommended)
Step 12: In the Endpoint field enter europe.vpn.penguinvpn.com:1637, example below:
europe.vpn.penguinvpn.com:1637
Step 13: In the Allowed IPs field enter 0.0.0.0/0, example below:
0.0.0.0/0
Step 14: At the top of the screen click the disk icon to save
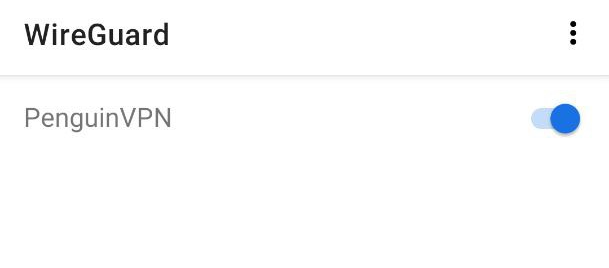
Step 15: To connect just open the WireGuard app and click the PenguinVPN tunnel to connect
Step 16: Check you are actually connected to the VPN via visiting https://www.infosniper.net/