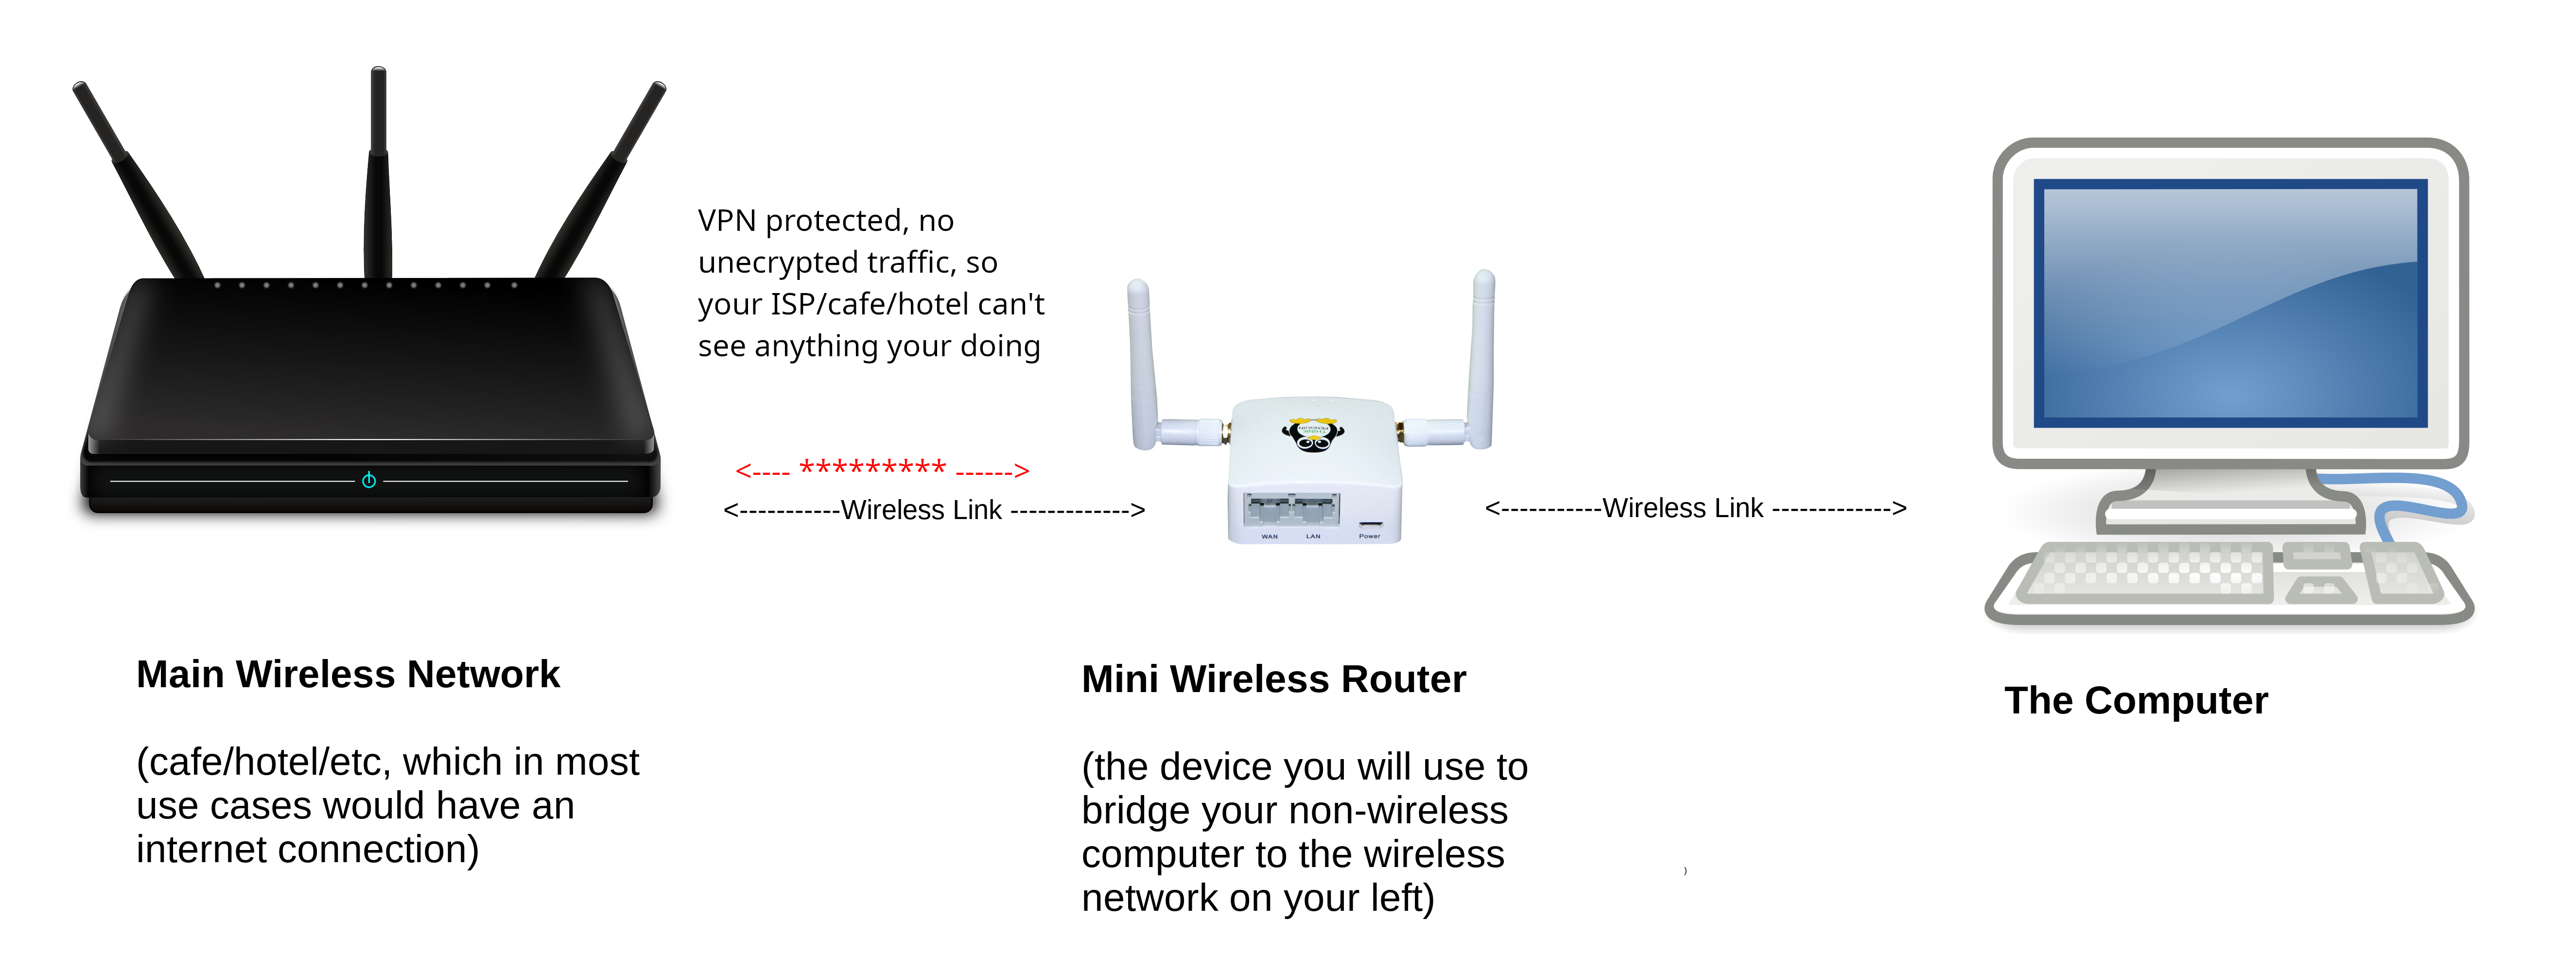
These directions have been thoroughly tested under libreCMC 1.5.14 and libreCMC 6.5, but should work for at least the 1.5.x series and the 6.x series. This will let you connect your mini router to an access point like a Verizon Jetpack, someone else's wifi (that you presumably have permission to use), etc and then all traffic connecting to the mini router via wireless or via ethernet will be transparently passed through the upstream access point via a VPN encrypted tunnel and out through a PenguinVPN server. To utilize these directions you will need a PenguinVPN subscription.
Warning: The below configuration / instructions for the libreCMC 1.5 version don't include how to modify the configuration to protect against TunnelVision / DHCP option 121 attack. A rogue DHCP server could undermine the VPN connection. If you have questions about how to fix this contact support and let us know what the problem is (TunnelVision / DHCP option 121 attack) and which set of directions you're requesting an update to. The libreCMC 6.x version on the other hand DOES protect against TunnelVision.
1. If you have not done so sign up for PenguinVPN service at https://www.thinkpenguin.com/gnu-linux/penguinvpn-subscription-1-3-12-36...
2. Select the appropriate configuration and then
3. Click the Add to cart button
4. Go to checkout
5. Make payment
6. Wait for email containing configuration information
7. Download the configuration information
8. Open it in a text editor
9. Download the PenguinVPN relay tar.gz configuration for your version of libreCMC (ie there is a 1.5.x release and a 6.x release)
For 1.5.x download:PenguinVPN relay 1.5.x tar.gz configuration
For 6.x download:PenguinVPN relay 6.x tar.gz configuration
10. Connect the antennas, micro USB power cable, and an ethernet cable from the LAN port on the mini router to a LAN port on your PC.
11. Disconnect from any wireless access points on your computer
12. Select the ethernet to request an IP
13. Open firefox and go to https://192.168.10.1/ (this is the default address to configure your router)
14. Click the Advanced ... button and then the Accept the Risk and Continue button
15. Click the Login button
You probably do not need to install wireguard if you have a router with the OEM libreCMC image as Wireguard is included, but if you are on a librecmc.org image then you may need to connect the router to the internet and install wireguard first. This is steps 16-40. You can skip these steps if you have a router with the original libreCMC ThinkPenguin OEM firmware.
16. Click the Go to password configuration... button
17. Enter a password you would like to use, we're going to use 'none' without the quotes for demonstration purposes
18. Click the Save button, then the Dismiss button
19. Go to Network > Interfaces and click the Edit button next to LAN
20. Set the IPv4 address to 192.168.3.1
21. Click the Save & Apply button
22. Click Apply anyway
23. Disconnect from the ethernet on your computer and reconnect
24. In the address bar go to https://192.168.3.1 and hit enter (this is your new router's address to configure your router)
25. Click the Advanced... button and the Accept the Risk and Continue button
26. Login using the password you set in step 9
27. Go to Network > Wireless
28. Click the Scan button
29. Click the Join Network button for the access point / network that you'd normally connect to access the internet from a computer
30. Enter the password for this network (assuming there is one)
31. Click the Submit button
32. Click the Save & Apply button
33. Go to System > Software
34. Click the Update lists... button
35. If signature check passed click the Dismiss button
36. Go to the Filter box and search for luci-proto-wireguard
37. Click the Install... button next to luci-proto-wireguard (under where it says Package name)
38. Click Install button to proceed
39. Click Dismiss button
40. Repeat steps 36-39, but replace luci-proto-wireguard with wireguard and then do it again with luci-app-wireguard
41. Go to System > Backup / Flash Firmware
42. In the Restore section click the Browse... button
43. Find the PenguinVPN relay configuration tar.gz file you downloaded in step 9
44. Click the Select button
45. Click the Upload archive... button
46. On the PC disconnect and reconnect from the ethernet using the network applet
47. After a minute or go to https://192.168.3.1 in the address bar of your browser and hit enter, this is the new address of the mini router where you can configure your router
48. There is no default password set in the v6.x configuration, and for the 1.5.x release the default password is the word 'none' without the quotes
Note: Click the Advanced... button and the Accept the Risk and Continue button
49. Go to Network > Interfaces and click the Edit button next to the WIREGUARD interface
50. Enter the PrivateKey from the .conf file into the Private Key box.
51. In the IP Addresses box enter the Address from the conf file (example: 10.67.153.173/32) and then click the + button to add the IP
52. Do the same for the Public Key in the Peers section
53. In the Peers section do the same for Allowed IPs
54. In peers section make sure you have checked the Route Allowed IPs box
55. Copy the Endpoint = ip address (example: 185.216.33.114) into the Endpoint Host box
56. Copy the Endpoint = port into the Endpoint Port box (everything that comes after the : on the Endpoint = line)
57. Enter 15 into the Persistent Keep Alive box
58. Under the Additional field drop down select Preshared Key, then click the add button
59. Copy the PresharedKey from the configuration file to the Preshared Key box
60. Click Save & Apply button
61. Go to System > Reboot and click Perform reboot button
62. Open the firefox web browser and go to https://192.168.3.1
63. Click Advanced and Accept Risk and Continue links/buttons
64. Login
Note: The default password is the word 'none' without the quotes
65. Go to Network > Wireless and click the Scan button
66. From the list of networks click the one that you'd like to utilize for internet access
67. In the WPA passphrase box enter your access point's password (aka the one you want your mini router to connect to)
68. Click the Submit button
69. Click the Save & Apply button
70. Go to System > Reboot and click the Perform reboot button
71. You can now disconnect the ethernet cable from the mini router and go to the network applet on your computer and select the libreCMC access point to connect wirelessly. The default password for the access point is 'librecmc'.
If you open up a web browser and visit https://www.infosniper.net you'll see that you are connected from another country.
Directions for users who bought a router with this setup already configured:
0. Screw the antennas on
1. Connect the power cable to the router (this is a micro usb cable that plugs into a type-A USB port on a computer or a USB power adapter that then connect to a wall socket)
2. Connect an ethernet cable from your computer's ethernet port to the LAN port on the mini wireless router (Note: Turn the wireless off from the computer’s network applet if using the wired approach to connect)
If you wish to connect using wireless connect to the router by selecting the libreCMC-VPN access point in your computers network applet, the default password for the libreCMC-VPN access point is ‘librecmc’ without the quotes
3. Open the Firefox web browser and go to https://192.168.3.1
4. Click Advanced and Accept Risk and Continue links/buttons
5. Login
Note: The default password is the word 'none' without the quotes
6. Go to Network > Wireless and click the Scan button
7. From the list of networks click the one that you'd like to utilize for internet access
Example:If you have a Verizon Jetpack it may be labeled something like Verizon-MiFi551
8. In the WPA passphrase box enter your access point's password (aka the one you want your mini router to connect to, ie the Verizon Jetpack)
9. Click the Submit button
10. Click the Save & Apply button
11. Go to System > Reboot and click the Perform reboot button
12. You can now disconnect the ethernet cable from the mini router and go to the network applet on your computer and select the libreCMC access point to connect wirelessly. The default password for the access point is 'librecmc'
If you open up a web browser and visit https://www.infosniper.net you'll see that you are connected from another country